We offer a wide collection of free, high-quality printable coloring pages for kids and adults. From cute animals to intricate mandalas, our designs bring creativity and relaxation to everyone. Download, print, and start coloring today!
Let’s be honest – noses are the bane of every beginning artist’s existence. You’ve probably spent countless hours trying to make that one facial feature look right, only to end up with something that resembles a potato or, worse, a sideways question mark. Trust me, I’ve been there!
Here’s the good news: By the end of this guide, you’ll understand the structure of the nose and be able to draw it confidently from any angle and in various styles. We’ll cover everything from basic anatomy to advanced shading techniques, plus how to draw different nose types that reflect the beautiful diversity of human faces.
Whether you’re sketching realistic portraits or diving into cartoon styles, this comprehensive guide will transform your approach to drawing noses forever.
how to draw a nose step by step
step 1

step 2
step 3
step 4
step 5
step 6
step 7
step 8
step 9
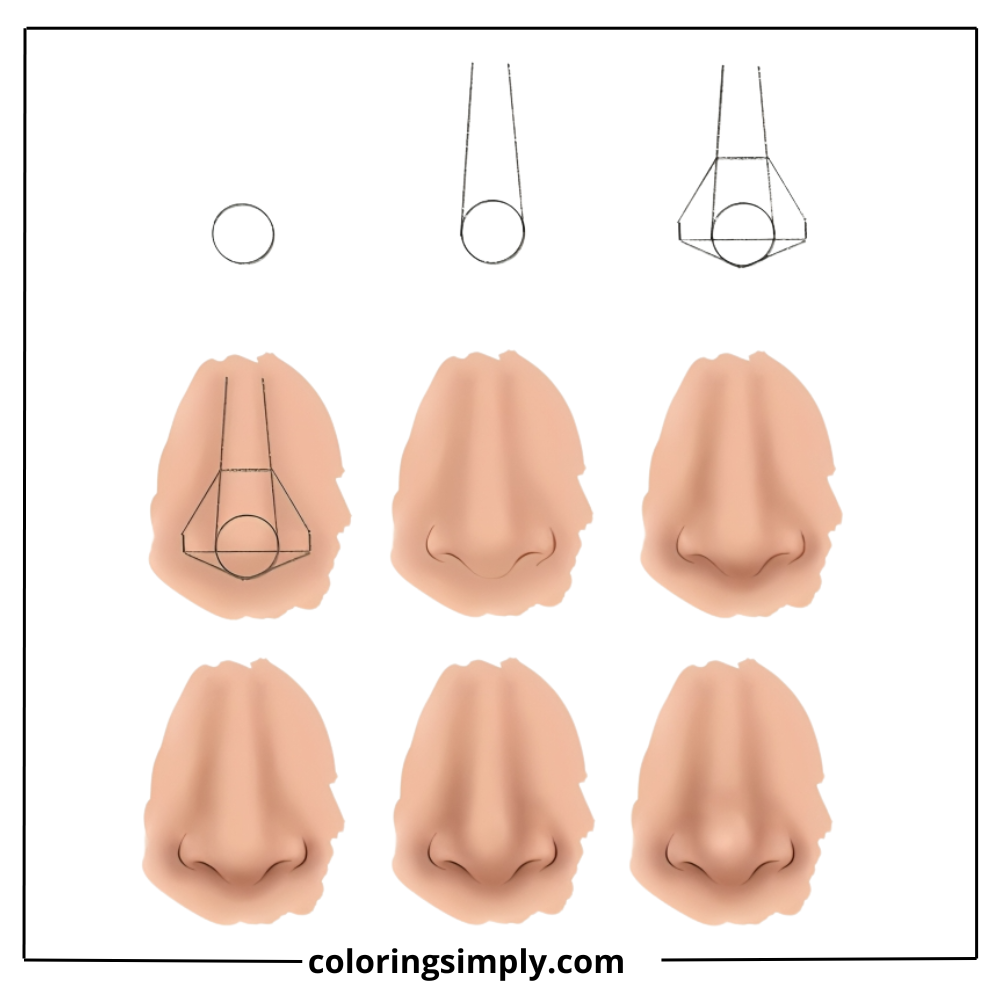
Table of Contents
The Secret: Understanding Nose Anatomy for Artists {#understanding-nose-anatomy}
Here’s what separates struggling artists from confident ones: understanding the simple underlying structure. Most people try to draw what they think a nose looks like, but successful artists draw what they know is there.
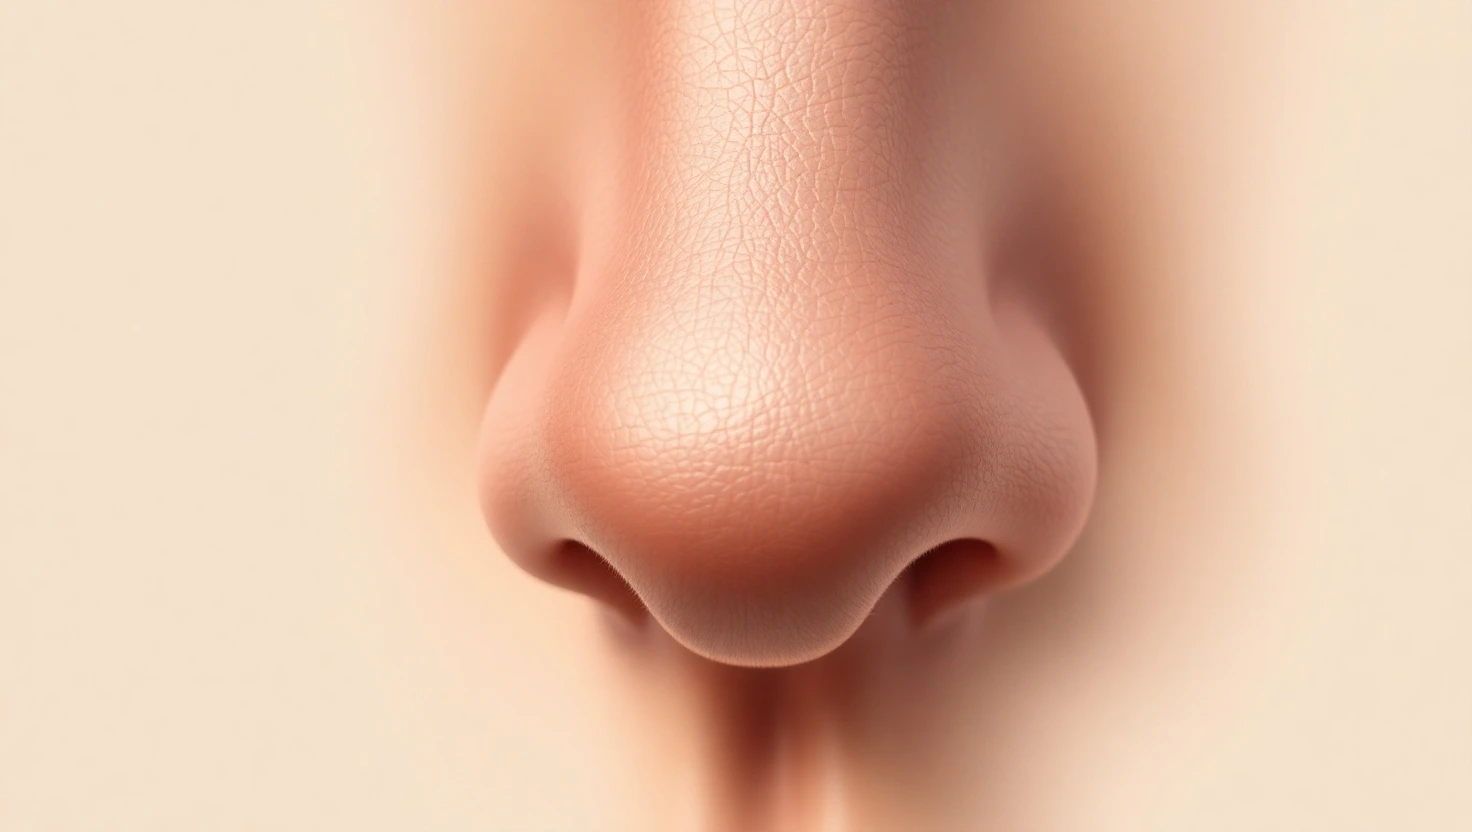
The nose isn’t just a random bump on the face – it’s a carefully constructed form with predictable planes and shadows. Here’s a clear breakdown of the essential points you should know:
Nasal Bone: The solid structure forming the upper bridge of the nose. It’s narrow and creates the sharp edge you see in profile views.
Upper and Lower Lateral Cartilage: These cartilages shape the sides of the nose, forming the softer, gently curved areas beneath the nasal bridge.
Alar Cartilage: This shapes the tip and nostrils. It’s the most flexible part and varies dramatically between different nose types.
Septum: The central wall that divides the nostrils. You’ll see this clearly in front and 3/4 views.
Here’s the key takeaway: These anatomical parts create distinct planes that catch light differently. When you understand these planes, shading becomes logical instead of guesswork.
The Foundational Method: Drawing a Nose with Simple Shapes {#foundational-method}
Every great nose drawing starts with the same basic approach – the simplified sphere method. Think of it as the skeleton that supports everything else.
Start with three simple shapes:
- A large sphere forms the tip of the nose.
- Two smaller spheres on either side for the nostril areas
This “three-sphere” approach works for every angle and every nose type. The magic happens when you connect these spheres with the bridge and refine the outline.
Here’s your basic process:
- Draw the three spheres in the correct proportions
- Connect them with the nasal bridge – this creates your basic structure
- Refine the outline by following the natural curves these shapes create
This foundation will serve you whether you’re drawing a button nose or a prominent Roman nose. The proportions might change, but the underlying structure remains the same.
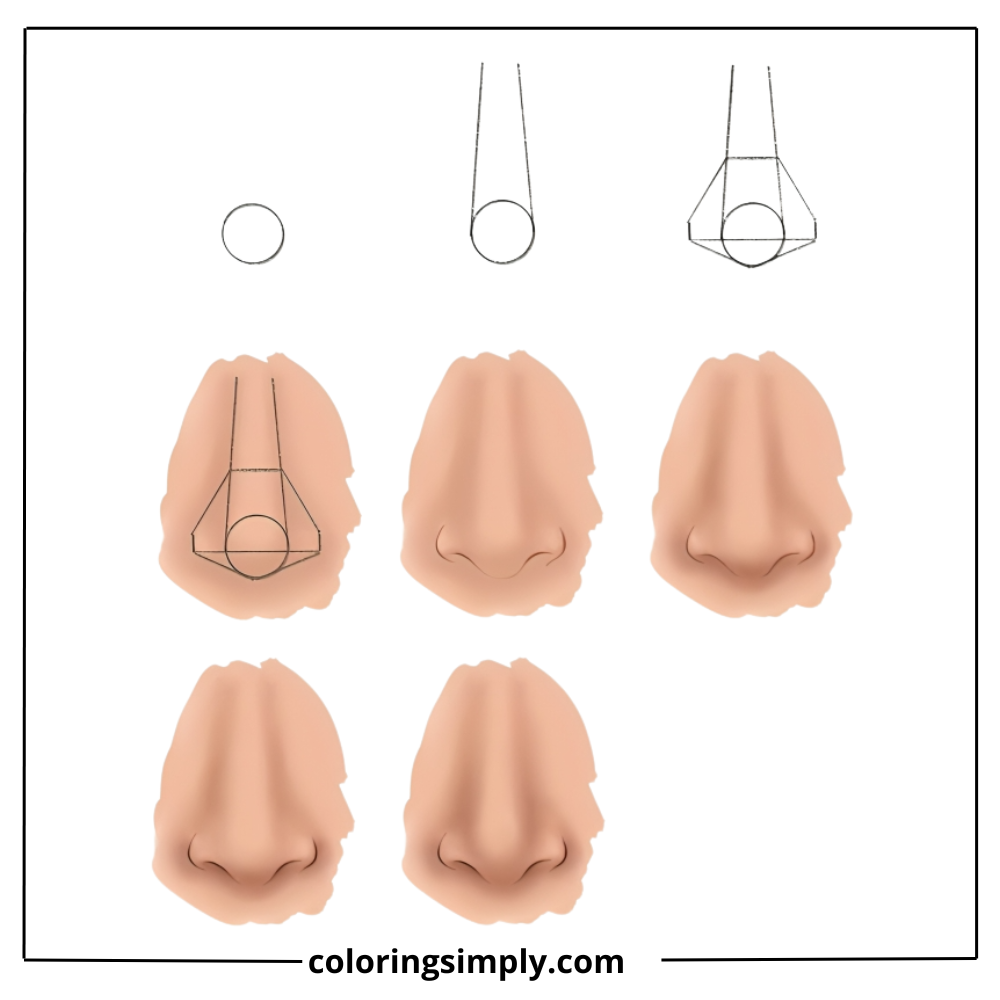
Step-by-Step: How to Draw a Nose from the Front {#front-view-steps}
Let’s put theory into practice with a detailed, step-by-step approach. Learning how to draw a nose easy starts with breaking it down into manageable steps.
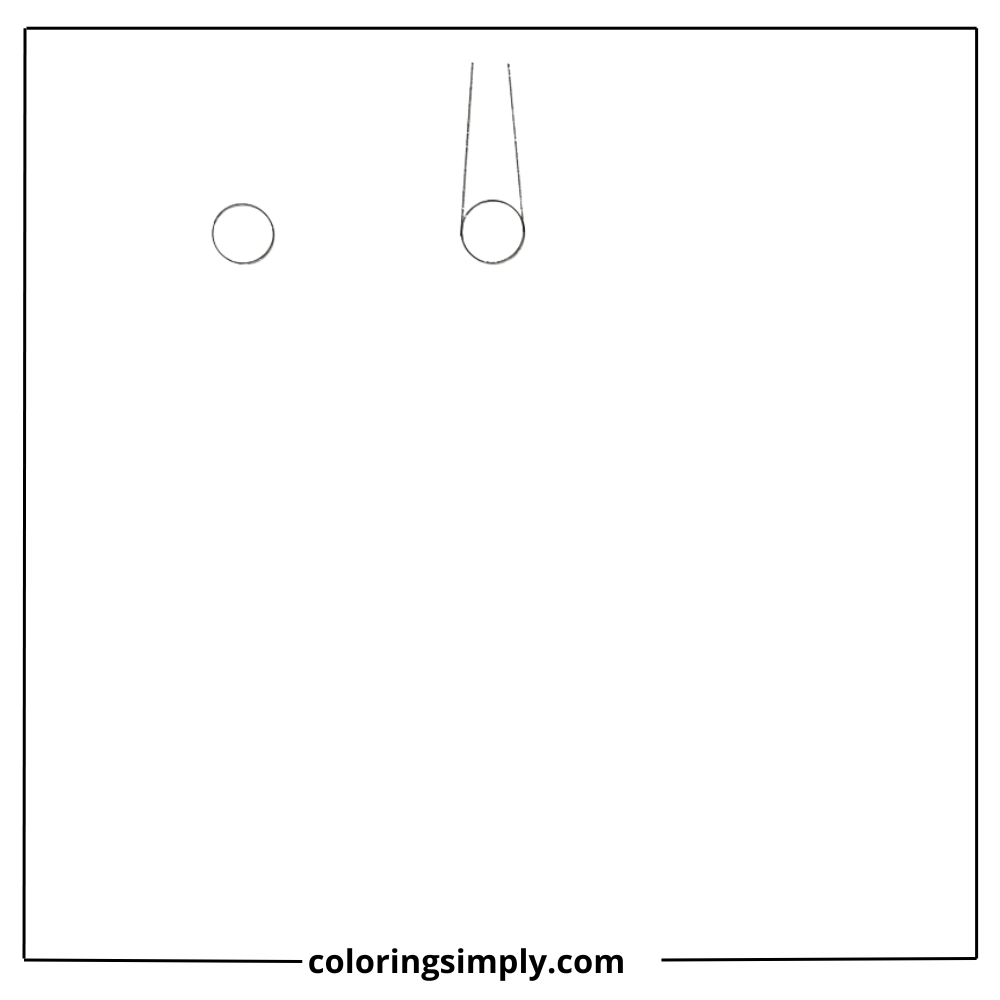
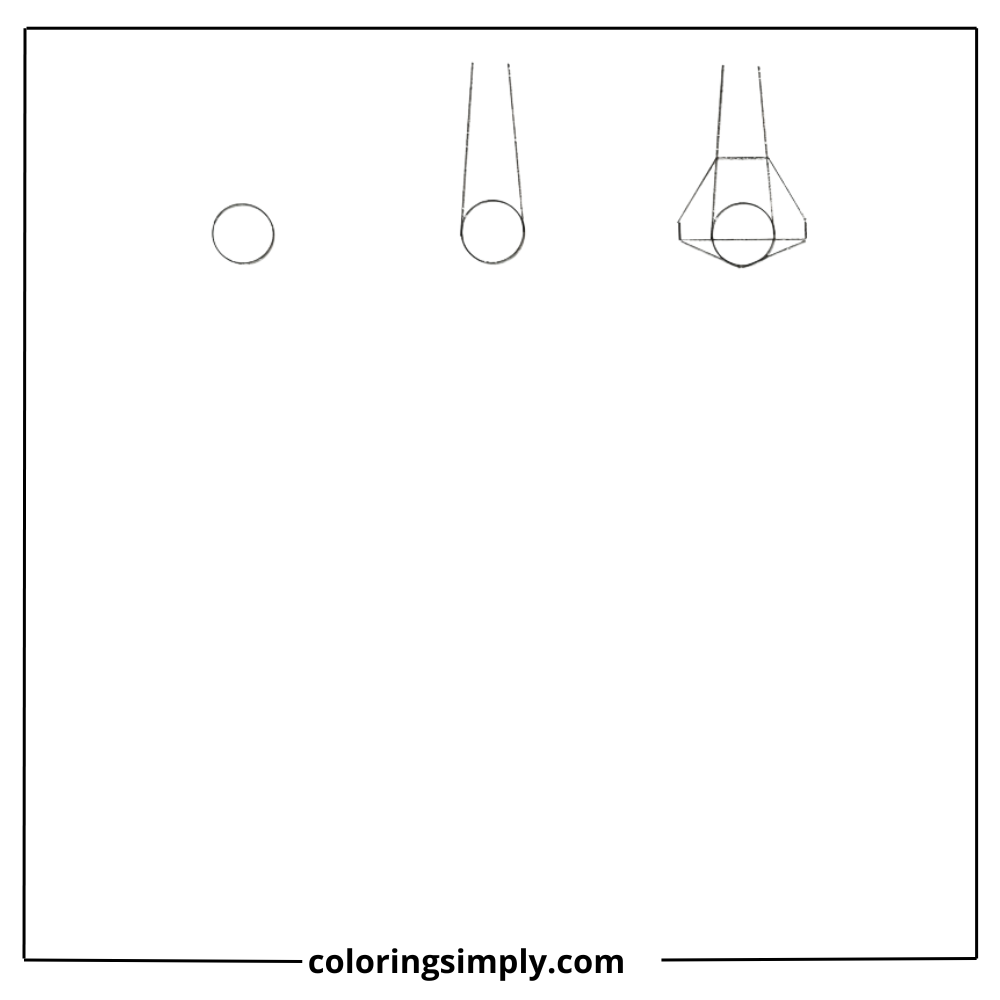
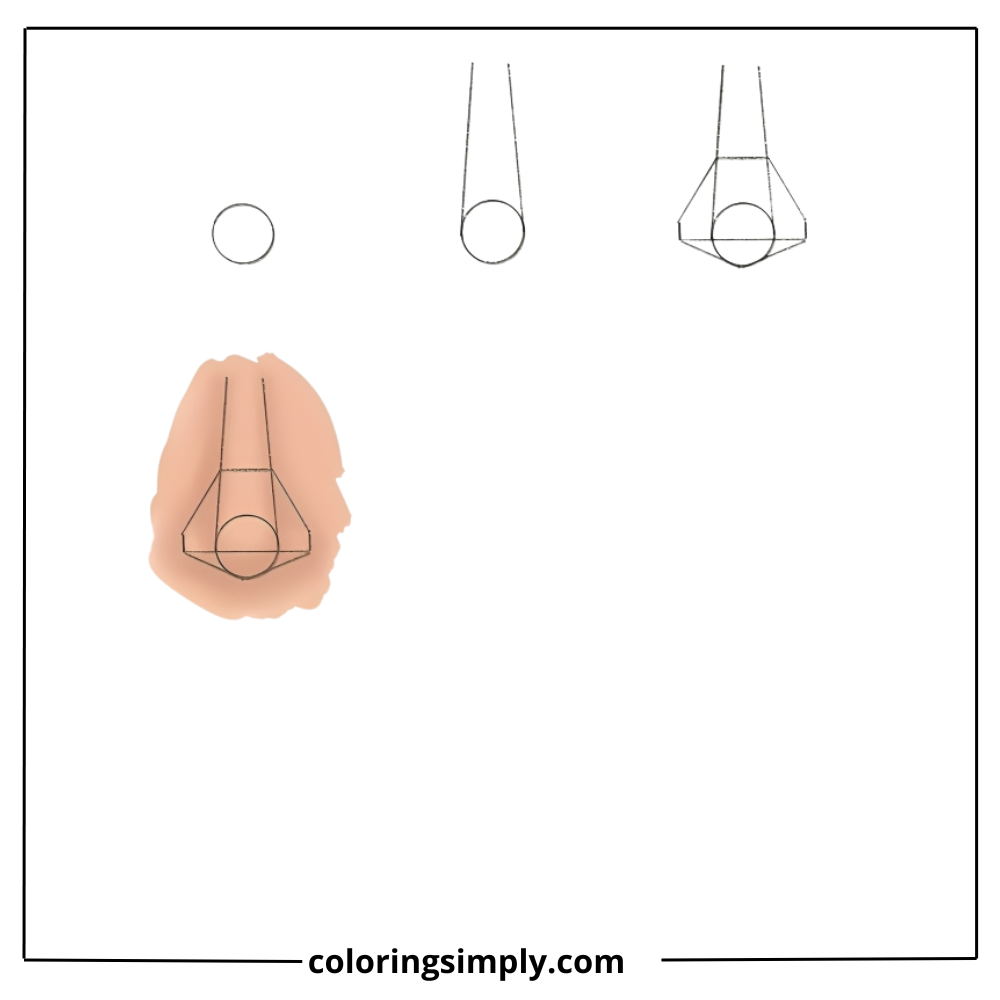
Step 1: Create Your Foundation Start with three circles arranged in a triangle formation. The top circle, which represents the nose tip, should be slightly larger than the two smaller circles below it that represent the nostrils.
Step 2: Define the Bridge and Wings Draw two curved lines from the top of your drawing area down to connect with the tip circle. These form the sides of the nasal bridge. Draw curved lines extending outward from the nostril circles to form the alar wings.
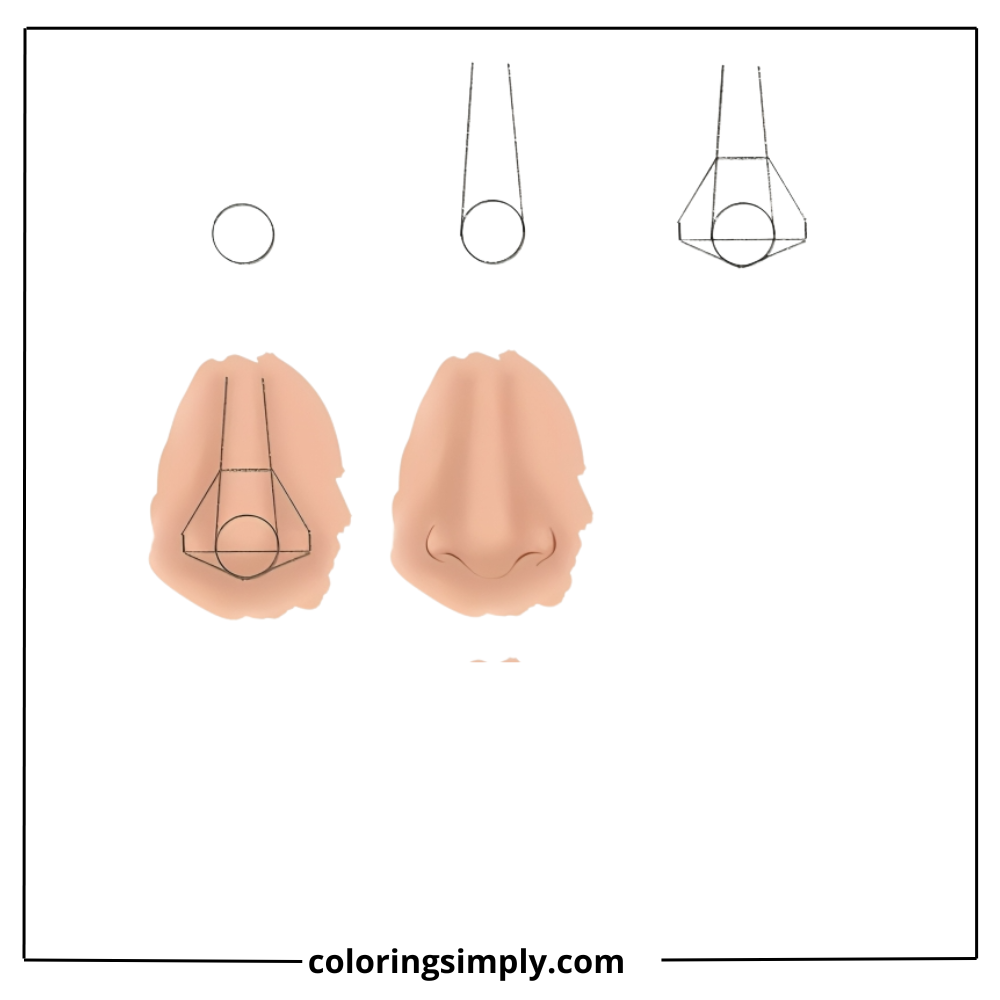
Step 3: Refine Your Line Art Erase your construction circles and smooth out the connections. The nose should now have a clear, flowing outline that captures the basic nose shape.
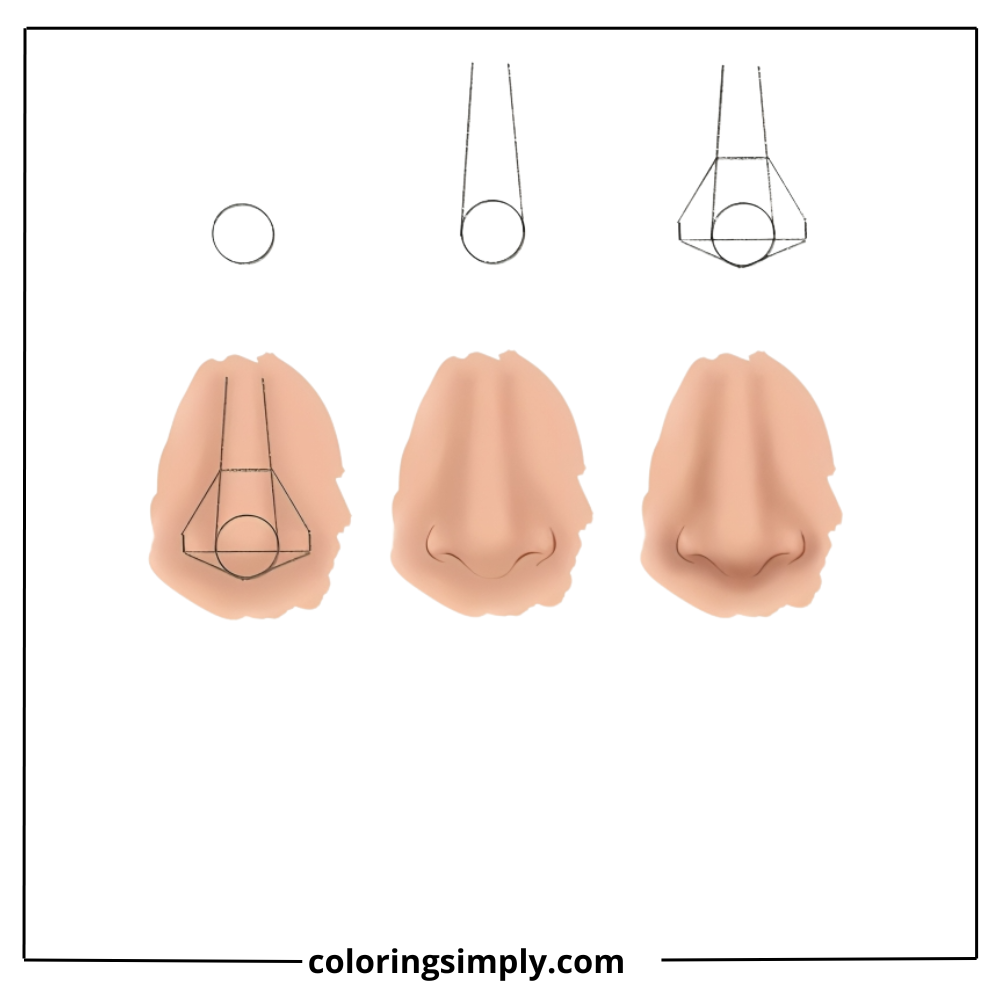
Step 4: Identify the Main Planes Mark three key areas: the front plane (tip and bridge), and the two side planes (the areas that curve away from the light source).
Step 5: Add Basic Shading Shade the side planes with a medium tone. Leave the front plane light to create dimension.
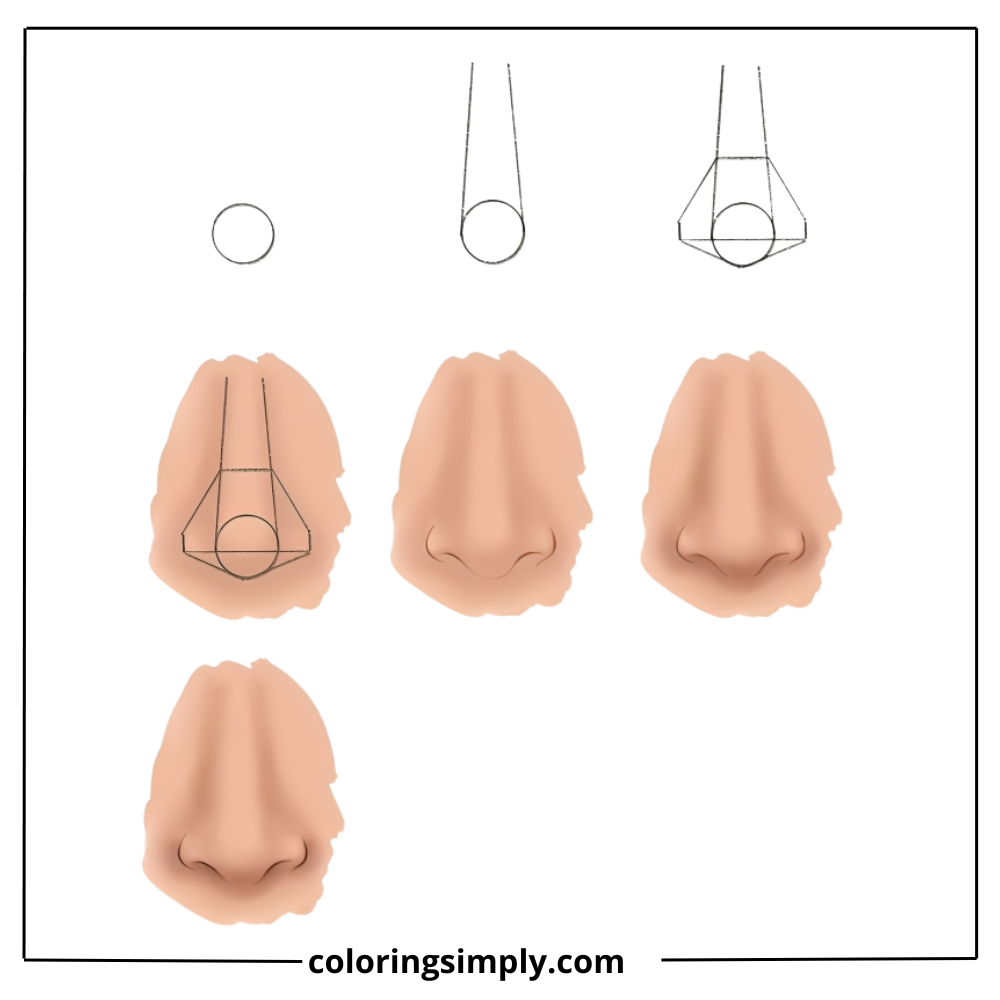
Step 6: Add Highlights and Accents Place your brightest highlight on the tip and bridge. Add darker accents in the nostril openings and where the nose meets the face.
Step 7: Blend and Refine Use blending tools to smooth transitions between light and shadow. Include subtle details, like the gentle shadow the nose casts on the upper lip.
Step-by-Step: How to Draw a Nose from the Side (Profile View) {#side-view-steps}
The profile view might seem easier, but it has its own challenges. The key is recognizing that the side view creates a distinctive triangular shape.
Step 1: Start with a Triangle Draw a triangle that points toward the tip of the nose. This isn’t your final shape, but it helps establish the basic proportions.
Step 2: Round the Tip Replace the pointed tip of your triangle with a rounded curve. This creates the bulbous end of the nose.
Step 3: Define the Nostril Add an oval or teardrop shape for the nostril opening. Remember, you’re only seeing one nostril from this angle.
Step 4: Connect to the Face
Draw the bridge of the nose so that it flows naturally into the brow area, and extend the base to meet the upper lip region.
Step 5: Refine the Outline Smooth out all connections and erase construction lines. The profile ought to display a smooth, graceful curve extending from the bridge to the tip.
Step 6: Create Dimension Shade the underside of the nose and the inside of the nostrils. The top surfaces should remain lighter to show the light source from above.
Step-by-Step Guide: Drawing a Nose from a 3/4 Angle {#three-quarter-view}
The three-quarter view is where many artists struggle because it combines elements of both front and side views. The key is understanding how perspective changes what you see.
Step 1: Modified Sphere Approach Use your three-sphere method, but make the spheres slightly elliptical to account for the angle. One nostril sphere will be more visible than the other.
Step 2: Form the Bridge The bridge should flow smoothly with a gentle curve across the face.
One side will appear more prominent than the other because of the angle.
Step 3: Handle the Asymmetry The nostril closer to you will appear larger and more detailed. The far nostril will be partially hidden and smaller.
Step 4: Refine the Form Connect all the elements seamlessly, focusing on how the nose gently curves along the shape of the face.
Step 5: Add Shading for Depth Shade the side that faces away from the light source to create a sense of dimension.
Use this to enhance the three-dimensional feeling.
The Game Changer: How to Draw Different Types of Noses {#different-nose-types}
Here’s where this guide really shines – learning how to draw a simple nose isn’t just about one “standard” nose. Real faces come in amazing variety—let your art celebrate that beautiful diversity.
Drawing a Broad Nose
Wide noses typically feature broader nostrils and usually have flatter bridges. Start with your three-sphere approach, but make the spheres larger and place them further apart. The bridge connection should be wider and less pronounced.
Key characteristics:
- Wider nostril base
- Less prominent bridge
- Fuller, rounder tip
- More horizontal orientation
Drawing a Narrow or Aquiline Nose
These elegant noses feature prominent bridges and narrow profiles. Your foundational spheres should be smaller and closer together, with a strong, defined bridge connection.
Key characteristics:
- Prominent, sharp bridge
- Narrow nostril base
- Often longer overall length
- Strong vertical emphasis
Drawing a Hooked or Roman Nose
The distinctive curve of a Roman nose comes from an extended nasal bone. Start with your basic structure, but extend the bridge with a gentle outward curve before it connects to the tip.
Key characteristics:
- Curved bridge profile
- Strong, defined structure
- Prominent from side view
- Often larger overall proportions
Drawing a Button Nose
Small and upturned, button noses are characterized by their compact size and upward-tilting tip. Try using smaller base spheres and tilt the tip gently upward.
Key characteristics:
- Compact overall size
- Upturned tip
- Visible nostrils from front view
- Soft, rounded edges
Drawing an Upturned Nose
Similar to button noses but can be larger. The key feature is the upward angle of the tip, which makes the nostrils more visible from the front.
Key characteristics:
- Upward-angled tip
- Visible nostril openings
- Shorter appearance from profile
- Youthful, soft appearance
From Lines to Life: How to Shade a Nose Realistically {#realistic-shading}
Shading turns a flat drawing into a realistic, three-dimensional shape. But here’s the secret: successful shading isn’t about randomly adding gray areas – it’s about understanding how light behaves on the nose’s specific planes.
Imagine a light source coming from above and slightly to one side. This creates predictable shadow patterns:
Core Shadows: The sides of the nose that face away from the light source. These are your medium-dark tones.
Reflected Light: Even shadowed areas receive some bounced light. This prevents your shadows from going completely black.
Highlights: The areas that face the light source directly – typically the bridge and tip.
Cast Shadows: Don’t forget the small shadow the nose casts on the upper lip and cheek.
Start with your basic three-tone approach: light, medium, and dark. Then gradually add more subtle variations. The key is smooth transitions – harsh lines will make your nose look flat and artificial.
Exploring Different Styles: Cartoon and Anime Noses {#stylized-noses}
Realistic drawing isn’t the only game in town. Cartoon and anime styles offer creative freedom while still requiring solid foundational knowledge.
Cartoon Noses: These are all about simplification and exaggeration. You might reduce a nose to just two dots for nostrils, or exaggerate its size for comedic effect. The key is consistency within your chosen style.
Anime Noses: Typically minimal, anime noses often appear as simple lines or small triangular shapes. The challenge is making them feel integrated with the face despite their simplicity.
For both styles, start with your realistic foundation, then simplify. Understanding the underlying structure helps you decide what to keep and what to stylize.
5 Common Nose-Drawing Mistakes (and How to Fix Them) {#common-mistakes}
Even with solid technique, certain mistakes pop up repeatedly. Here’s how to spot and fix them:
1. The Floating Nose Your nose looks disconnected from the face. Fix it by clearly defining how the bridge connects to the brow area and how the base connects to the upper lip.
2. Over-Outlining Heavy, dark outlines make noses look flat. Instead, use subtle value changes to define edges. Save your darkest lines for deep recesses like nostril interiors.
3. Perfect Symmetry Real noses aren’t perfectly symmetrical. Introduce subtle variations between the left and right sides for more natural results.
4. Flat Shading Avoid using flat gray tones to fill areas. Instead, shade by following the form, illustrating how the surfaces curve toward or away from the light source.
5. Missing Cast Shadows Don’t forget the small shadow the nose casts on the face. This simple detail significantly improves the three-dimensional appearance.
Practice Makes Perfect: Your Free Nose Drawing Worksheet {#practice-worksheet}
Knowledge without practice is just theory. That’s why I’ve created a comprehensive practice worksheet that includes:
- Anatomical reference diagrams
- Step-by-step construction templates
- Various nose types for copying
- Shading exercises with different lighting scenarios
The worksheet reinforces everything we’ve covered while giving you structured practice opportunities. Keep in mind that drawing noses takes practice—be patient with yourself and appreciate every small improvement along the way.
Conclusion
Drawing noses doesn’t have to be the stumbling block that stops your artistic progress. By understanding basic anatomy, starting with simple shapes, and practicing different types and angles, you’ll develop the confidence to tackle any nose with skill.
Remember these key takeaways:
- Anatomy knowledge makes shading logical
- Simple shapes provide strong foundations
- Diversity in nose types creates more interesting, realistic art
- Practice with intention beats mindless repetition
The nose is just one part of the face, but mastering it opens doors to more convincing portraits overall. Your journey to better drawing starts with understanding that every challenging skill can be broken down into manageable steps.
Ready to take your portrait skills to the next level? Check out our companion guides on drawing eyes and drawing lips to complete your facial feature toolkit. With these skills combined, you’ll be creating stunning portraits that capture the unique beauty of every face you draw.